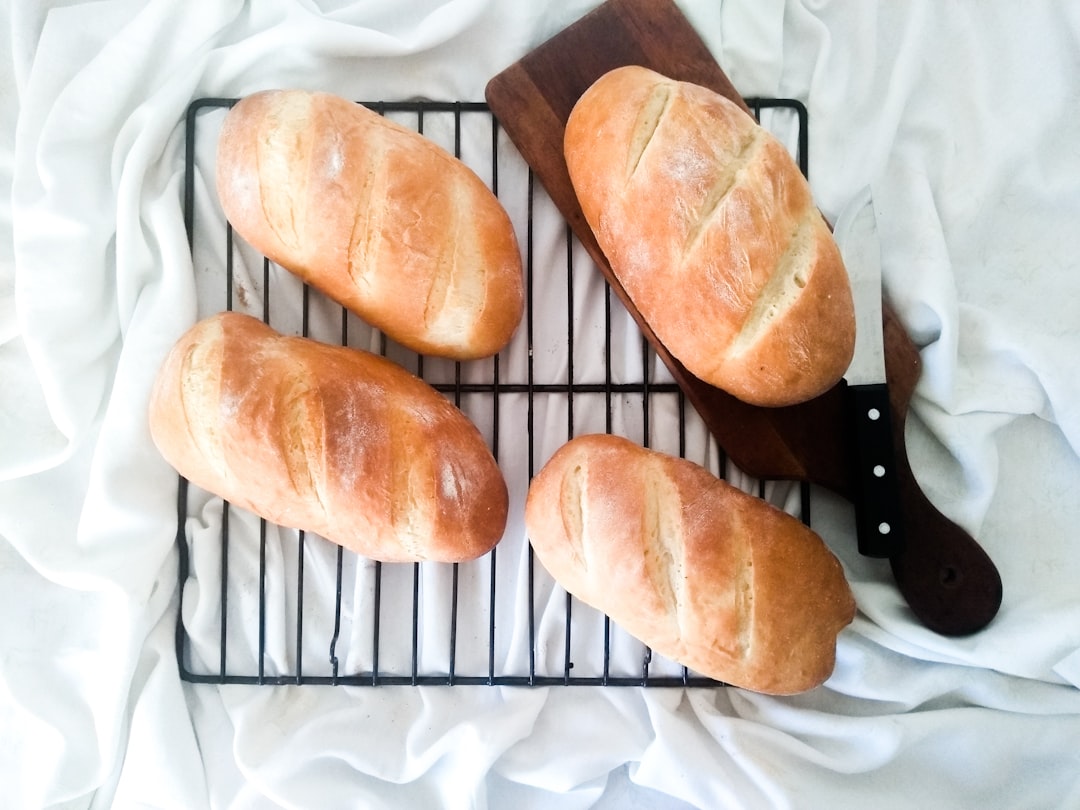
Ever wondered if you can get that amazing sourdough flavor and texture in a smaller, more manageable package? You absolutely can! Delicious sourdough mini loaves are a fantastic way to enjoy the tangy goodness and chewy crumb of sourdough without committing to a full-sized loaf. They’re perfect for individuals, smaller households, or when you just want a delightful treat that’s easy to share (or not!). Let’s dive into what makes these little guys so great and how you can make them yourself.
Thinking about baking sourdough can be a little intimidating, especially with the commitment of a large loaf. Mini loaves cut down on that perceived pressure and offer a lot of practical advantages.
The Perfect Portion
Sometimes, a whole sourdough loaf feels like too much. Maybe you live alone, or you simply don’t go through bread that quickly. Mini loaves are the answer. You get all the flavor and satisfaction of a sourdough bake, but in a size that’s just right for a single serving or a week’s worth of delightful additions to your meals. No more worries about last week’s loaf going stale before you can finish it.
Quick Baking Times
One of the most appealing aspects of mini loaves is their significantly reduced baking time compared to their full-sized counterparts. This means less waiting and more enjoying. For busy bakers, this is a game-changer. You can get a fresh loaf out of the oven in a fraction of the time, making spontaneous baking much more feasible.
Versatility in Serving
Mini loaves aren’t just for sandwiches. Their smaller size makes them ideal for individual servings as a side to soup or salad, as a base for small appetizers, or even pulled apart and toasted for a delightful breakfast with jam or butter. Their compact nature lends itself to a variety of creative culinary uses.
Great for Gifting
Let’s be honest, who wouldn’t appreciate a homemade, delicious sourdough mini loaf? They make wonderful, thoughtful gifts for friends, neighbors, or as a hostess present. They’re more personal and less overwhelming than a large loaf and are usually an instant hit with anyone who receives them.
If you’re interested in perfecting your sourdough baking skills, you might find the article on sourdough mini loaves particularly helpful. It offers tips and techniques for achieving the ideal texture and flavor in smaller portions, making it perfect for those who want to enjoy fresh bread without committing to a full-sized loaf. For more insights, check out this related article on sourdough baking: Sourdough Calculator Blog.
Understanding the “Mini” in Sourdough
The concept of a “mini” sourdough loaf is pretty straightforward, but there are a few things to consider that differentiate them from larger bakes.
What Defines a Mini Loaf?
Generally, a mini sourdough loaf refers to a bake intended for individual serving or very small households. This usually translates to loaves weighing anywhere from 250 to 500 grams (roughly 9 to 18 ounces) of finished dough. They are often baked in smaller loaf pans, Dutch ovens designed for two, or even cast iron skillets.
Scale vs. Adaptation
When you move from a full-sized loaf recipe to a mini loaf, you’re essentially scaling down the ingredients. However, it’s not always a simple 1:1 ratio for everything. Sometimes, adjustments to hydration or fermentation times might be needed, though for a straightforward adaptation, a simple mass reduction usually works well.
Ingredient Ratios Do Matter
Even in smaller bakes, the ratio of ingredients – flour, water, starter, and salt – remains crucial for that characteristic sourdough flavor and texture. Maintaining these proportions is key to achieving a successful mini loaf. If you’re adapting a recipe, it’s wise to double-check the baker’s percentages to ensure you’re not throwing things too far out of balance.
Crafting Your Sourdough Mini Loaf: The Dough
The heart of a great sourdough loaf, no matter the size, is the dough itself. Here’s how to approach it for those perfect mini bakes.
Starter Activation: The Foundation
Before you even think about mixing dough, make sure your sourdough starter is active and bubbly. A starter that has been recently fed and has doubled in size within a few hours is ideal. This guarantees it has the necessary yeast and bacteria to leaven your dough effectively.
Feeding Your Starter
- Timing is key: Feed your starter 4-12 hours before you plan to mix your dough. The exact timing depends on your starter’s activity level and ambient temperature.
- Ratio matters: A common and effective feeding ratio is 1:1:1 (starter:water:flour by weight). You can also use 1:2:2 for a more robust feed if your starter is sluggish.
- Watch for the float test: A well-fed starter should be able to float in water. This indicates it’s full of active gas.
Mixing Your Dough: The Autolyse Stage
This initial step helps to hydrate the flour and start gluten development without any kneading. It’s a gentle way to begin your dough-making process.
What is Autolyse?
- Combine flour and water: Mix your flour and most of your water until just combined. There should be no dry spots.
- Rest: Let this mixture sit for 20-60 minutes. You’ll notice the flour starts to absorb the water, and the mixture will become shaggier.
- Benefits: This stage makes the dough more extensible, meaning it can stretch more easily, leading to better gluten development and a more open crumb.
Incorporating the Starter and Salt
After the autolyse, it’s time to add the lively starter and the essential salt. This is where the real sourdough magic begins.
Gentle Incorporation
- Add starter: Dimple the starter into the autolysed dough. Use your hands to gently mix and stretch the dough, incorporating the starter evenly.
- Add salt and remaining water: Once the starter is somewhat incorporated, add the salt and any remaining water. Again, use a gentle mixing technique (like the ‘pincer’ or ‘stretch and fold within the bowl’) to integrate them without tearing the dough.
- Why salt later? Adding salt too early can inhibit gluten development and the activity of the starter.
Developing Gluten: Stretch and Folds
This is where you build the structure of your bread. Instead of vigorous kneading, sourdough often relies on a series of gentle stretch and folds over time.
The Art of Stretch and Folds
- Frequency: Perform these every 20-30 minutes for the first 1-2 hours of bulk fermentation.
- Technique: With wet hands, grab a portion of the dough from one side, stretch it upwards, and fold it over the rest of the dough. Rotate the bowl 90 degrees and repeat this process 3-4 times until you’ve gone around the entire dough.
- Purpose: Each set of folds strengthens the gluten network, building elasticity and strength in the dough. You’ll notice the dough becoming smoother and more cohesive with each set.
Bulk Fermentation: The Slow Rise
This is a crucial period where the yeast and bacteria in your starter work their magic, developing flavor and leavening the dough.
Monitoring the Rise
- Time: This can vary significantly depending on the temperature of your kitchen and the strength of your starter. It typically takes 4-8 hours, sometimes longer.
- Signs of readiness: The dough should have increased in volume by about 30-50%, feel airy, and have visible bubbles on the surface. It should also feel lighter and more jiggly.
- Patience is key: Resist the urge to rush this stage. It’s where much of the sourdough’s complex flavor develops.
Shaping Your Mini Loaves

Proper shaping is essential for good oven spring and a beautiful final loaf. For mini loaves, this step requires a bit of precision.
Pre-Shaping: Getting Ready
Before the final shape, a pre-shape helps to organize the gluten and prepare the dough for its final form.
The Gentle Round
- Technique: Lightly flour your work surface. Gently turn the dough out of its container. Using floured hands or a bench scraper, gently coax the dough into a round shape by pulling the edges towards the center and then flipping it over so the seams are underneath.
- Resting: Let the pre-shaped dough rest, uncovered, for 15-30 minutes. This allows the gluten to relax, making final shaping easier.
Final Shaping: The Mini Loaf Form
The goal here is to create surface tension without degasing the dough too much.
For Batard-Style Mini Loaves
- Flatten gently: Lightly flour your work surface and gently flatten the pre-shaped dough into a rough rectangle.
- The fold: Fold the top third down to the middle and press gently to seal. Then, fold the bottom third up and press to seal. You’ll have a shorter, wider rectangle.
- Rolling: Now, starting from the top edge, roll the dough down towards you, creating tension with each roll by gently pulling the dough towards you to seal the seam at the end. Aim for a compact cylinder.
- Sealing the seam: Pinch the seam closed firmly. You can also use the seam side as the bottom of your loaf.
For Boule-Style Mini Loaves
- Gather and tuck: With floured hands, gently gather the edges of the dough towards the center, creating a taut surface.
- Tucking: Flip the dough over so the seam is underneath. Gently cup your hands around the dough and rotate it on the floured surface, using the friction of the surface to tighten the surface by tucking the edges underneath.
- Aim for a dome: The goal is a tight, round dome.
Proofing: The Final Rise
This is the last chance for the dough to rise before it hits the oven.
Cold Retarding (Recommended)
- Placement: Place your shaped mini loaves into floured bannetons or bowls lined with floured tea towels. Ensure there’s enough room for them to expand.
- Cover and refrigerate: Cover the bannetons tightly with plastic wrap or place them in a plastic bag and refrigerate for 8-24 hours.
- Benefits: Cold retarding slows down the fermentation, allowing for more complex flavor development. It also makes the dough easier to score and handle when it’s cold.
Room Temperature Proofing
- Time: This is a much shorter process, usually 1-3 hours, depending on the ambient temperature.
- Check for readiness: The dough should feel light and puffy. A gentle poke should leave a slight indentation that slowly springs back. If it springs back immediately, it needs more time. If it stays indented, it might be over-proofed.
If you’re looking to enhance your baking skills, you might find it helpful to explore the art of sourdough mini loaves, which are perfect for those who want to enjoy fresh bread without the commitment of a full-sized loaf. For more insights on perfecting your sourdough creations, check out this informative article on mastering the art of sourdough, where you’ll discover valuable tips that can elevate your baking experience.
Baking Your Mini Sourdough
| Metric | Value |
|---|---|
| Weight | 250g |
| Calories | 150 |
| Protein | 5g |
| Fat | 2g |
| Carbohydrates | 30g |
The moment of truth! Getting that perfect crust and crumb on your mini loaves.
Oven Setup and Temperature
Preheating your oven correctly is crucial for a good bake.
Preheating with Steam
- Dutch Oven Method: If using a mini Dutch oven or two smaller ones, place them in the oven during preheating. This ensures they are screaming hot when the dough goes in.
- Baking Stone/Steel Method: For baking directly on a stone or steel, place a cast iron skillet or steam pan on the rack below where your loaves will bake.
- Temperature: Aim for a high initial baking temperature, typically 450-475°F (230-245°C).
Scoring and Loading
This step is important for controlling the expansion of your loaf.
Making the Cuts
- Lame or razor blade: Use a sharp blade (a baker’s lame or a clean razor blade) to make swift, confident cuts on the surface of your cold dough.
- For steam: A single, deep slash across the top is common for batards. For boules, you might do a cross or a more decorative pattern. The cuts allow the dough to expand predictably.
- Work quickly: Score the dough just before you load it into the oven.
Loading into the Oven
- Dutch Oven: Carefully remove the hot Dutch oven lid. Use parchment paper to carefully lower the dough into the hot pot. Place the lid back on.
- Stone/Steel: Gently slide the dough (on parchment paper if desired) onto the preheated stone or steel.
- Add steam: If using the steam pan method, carefully pour about a cup of hot water into the preheated steam pan. Quickly close the oven door to trap the steam.
The Baking Process
This is a two-stage process: steaming for oven spring and then baking for crust development.
Stage 1: Steaming (First 20-25 minutes)
- Lid on (Dutch Oven): The lid traps the steam released from the dough, which keeps the crust soft initially, allowing for maximum oven spring.
- Closed oven (Stone/Steel): The initial steam from your water pan creates the humid environment.
Stage 2: Finishing the Bake (Next 15-25 minutes)
- Remove lid/steam pan: Once the oven spring has occurred (you’ll see the loaf has significantly risen), remove the lid from the Dutch oven or carefully remove the steam pan from the oven.
- Reduce temperature: Lower the oven temperature to around 425-450°F (220-230°C).
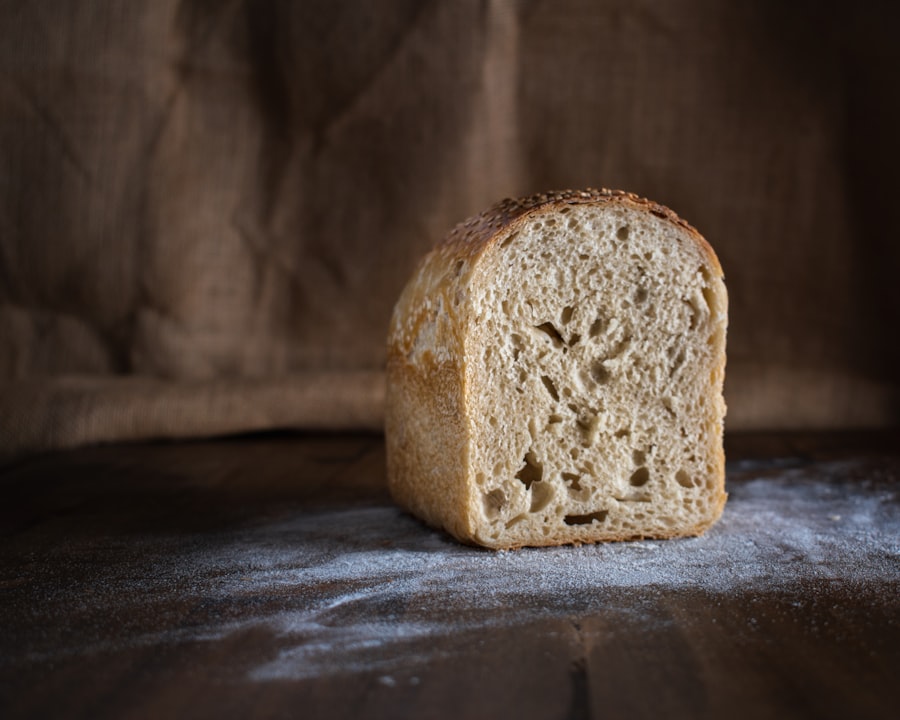
- Achieve crust: Continue baking until the crust is a rich golden brown and the internal temperature registers around 205-210°F (96-99°C) on an instant-read thermometer.
Cooling: Essential Patience
This is arguably the hardest part for any baker. Resist the urge to slice into it immediately!
Why Cooling is Crucial
- Completing the bake: The internal structure of the bread is still setting as it cools. If you cut it too soon, the crumb can be gummy and sticky.
- Flavor development: Flavors continue to meld and deepen as the bread cools.
- Allow airflow: Place your mini loaves on a wire rack to ensure air circulates around them, preventing the bottom crust from becoming soggy.
Enjoying Your Mini Masterpiece
You’ve done it! Now for the best part – savoring your creation.
Slicing and Serving Suggestions
The perfect bite-sized treat deserves a perfect serving.
Simple Pleasure
- Plain: A warm mini loaf, torn or sliced, with a good quality butter is an unparalleled experience.
- Jam or Honey: The tang of sourdough pairs beautifully with sweet spreads.
Savory Companions
- Soup or Stew: A crusty mini loaf is the ideal vehicle for soaking up delicious broths.
- Salads: Slice thinly and toast for delightful croutons or a side.
- Appetizers: Slice thinly, toast, and top with your favorite ingredients – avocado, smoked salmon, or bruschetta toppings.
Storage and Reheating
Keeping your mini loaves fresh for as long as possible.
Best Practices
- Room Temperature: Store cooled, uncut loaves in a paper bag or bread box at room temperature for 1-2 days. This allows the crust to retain some texture.
- Wrapped: For longer storage (3-4 days), wrap tightly in plastic wrap or place in a bread bag.
- Freezing: If you won’t finish them within a few days, slice or quarter the mini loaves and freeze them in an airtight container or freezer bag.
Reheating for Freshness
- Oven Reheat: For a refreshed crust, lightly mist the outside of a slice or mini loaf with water and warm in a preheated oven at 350°F (175°C) for 5-10 minutes.
- Toaster: Slices can also be re-toasted.
Troubleshooting Common Mini Loaf Issues
Even mini bakes can have their hiccups. Here’s how to address them.
Dense Crumb
This can happen for a few reasons.
Potential Causes and Solutions
- Under-fermented dough: Ensure you’re giving your dough sufficient bulk fermentation time. Look for visual cues like increased volume and bubbles.
- Over-handling during shaping: Be gentle during shaping to avoid pressing out too much of the air.
- Weak starter: Make sure your starter is vigorous and active before you begin.
- Temperature: Colder temperatures slow fermentation, so adjust your timing accordingly.
Flat Loaves (Lack of Oven Spring)
This means the oven spring wasn’t as strong as it could be.
Potential Causes and Solutions
- Over-proofed dough: If the dough has proofed for too long, it may not have the structure to spring up. Pay close attention to proofing indicators.
- Insufficient gluten development: Ensure you’re performing enough stretch-and-folds, especially in the early stages of bulk fermentation.
- Scoring issues: Shallow or poorly placed scores can restrict expansion. A confident, decisive score is key.
- Oven not hot enough: Double-check your oven’s temperature with an oven thermometer.
Gummy Interior
This usually points to the bread being cut too soon or not baked fully.
Potential Causes and Solutions
- Cutting too early: As mentioned, give the loaves ample time to cool completely on a wire rack.
- Under-baking: Use an instant-read thermometer to check the internal temperature. If it’s below 205°F (96°C), it needs more time.
By understanding these nuances, you’re well on your way to consistently baking delicious sourdough mini loaves that are a perfect bite-sized treat for any occasion. Happy baking!