So, you’re ready to bake some sourdough in your Dutch oven? Great choice! A Dutch oven is practically the essential piece of equipment for getting that fantastic crust and airy crumb we all chase in sourdough. It essentially creates a mini-oven within your oven, trapping steam around your loaf during the initial bake. This steam is crucial – it keeps the crust from setting too quickly, allowing the dough to expand freely (oven spring!) and develop that beautiful, crackly exterior. Without a Dutch oven, achieving a truly professional-looking sourdough at home is a significantly tougher task.
Let’s break down why this piece of cast iron is so indispensable for sourdough baking, beyond just trapping steam.
The Steam Advantage
Think about commercial bakeries. They have expensive steam-injected ovens. At home, our standard ovens are dry heat machines. A Dutch oven acts as a clever workaround. When the cold dough hits the hot Dutch oven, the moisture in the dough turns to steam almost instantly. This steam is then trapped inside, creating a humid environment around your loaf. This humidity is vital for a few reasons:
- Extended Oven Spring: The moist surface of the dough remains pliable for longer. This allows the internal gases generated by your yeast and bacteria to push and expand the dough, leading to a lighter, airier crumb and a larger loaf overall.
- Thin, Crispy Crust: Without steam, the crust forms too quickly and becomes thick and chewy. With steam, the crust stays soft and stretchy, allowing for maximum expansion. Once you remove the lid, the remaining dry heat bakes this delicate moist surface into that desired thin, crisp, and often deeply colored crust.
- Improved Flavor: While less direct, a better crust and crumb structure often contribute to a more enjoyable overall eating experience, allowing the subtle sour notes of your sourdough to shine.
Even Heat Distribution
Cast iron is an excellent heat conductor and retainer. When you preheat your Dutch oven, it stores a significant amount of thermal energy. This stored heat is then radiated evenly around your dough, ensuring a consistent bake from all sides. No more burnt bottoms and pale tops!
Structural Support
For very wet doughs, a Dutch oven provides gentle structural support. It helps the dough maintain its shape during the initial expansion phase, preventing it from spreading out too much and becoming a flat pancake. This is particularly helpful for beginners dealing with high-hydration sourdoughs.
If you’re interested in perfecting your sourdough baking techniques, you might find the article on using a cast iron Dutch oven particularly helpful. This method not only enhances the crust but also retains moisture, resulting in a beautifully baked loaf. For more insights and tips on sourdough baking, check out this informative piece at Sourdough Calculator Blog.
Choosing Your Sourdough Dutch Oven
There’s a bit of variety out there. Knowing what to look for will save you some headaches and ensure you get the best tool for the job.
Enamel vs. Bare Cast Iron
This is often the first decision point. Both have pros and cons.
- Enameled Cast Iron: This is what most people picture when they think “Dutch oven.” It’s cast iron coated in a layer of enamel.
- Pros: Easier to clean, non-reactive (good for acidic doughs, though sourdough pH is generally not an issue for seasoned bare cast iron), comes in fun colors.
- Cons: Can be more expensive, enamel can chip if dropped or if using metal utensils roughly, maximum temperature ratings sometimes apply (though 500°F/260°C is usually fine).
- Bare Cast Iron: Just raw, seasoned cast iron.
- Pros: Generally less expensive, incredibly durable (you can drop it without a chip, though it might crack), can handle very high temperatures (no enamel to worry about), builds up a beautiful non-stick seasoning over time.
- Cons: Requires more specific care (seasoning, avoiding harsh soaps), can rust if not properly dried and cared for.
For sourdough, either works perfectly well. Many sourdough bakers actually prefer bare cast iron for its robustness and natural non-stick properties once well-seasoned. If you have an enameled one already, great! Use it. If you’re buying new, consider the bare cast iron if you’re looking for ultimate durability and don’t mind the seasoning upkeep.
Size Matters
Most standard boules (round loaves) fit nicely in a 5-quart (4.7-liter) to 7-quart (6.6-liter) Dutch oven.
- 5-6 Quart (Round): Perfect for typical 500g-700g flour loaves. This is a great all-around size.
- 7-9 Quart (Round or Oval): Good for larger loaves, or if you prefer an oval shape for things like batards (oval loaves). Oval Dutch ovens are specifically designed for batard-shaped loaves.
- Too Small: Your dough will hit the sides and ceiling, potentially messing up the crust and shape.
- Too Big: While it will work, a larger Dutch oven takes longer to heat up and might not trap steam as efficiently around a smaller loaf, as there’s more empty space.
Aim for a size that leaves about 1-2 inches of space between your dough and the pot walls.
Lid and Handle Considerations
- Heat-Proof Knob: Many Dutch ovens have plastic or phenolic knobs that are not oven safe at high sourdough temperatures (often 450-500°F/230-260°C). You’ll need to either replace it with a metal one (many brands sell these) or remove it entirely before baking at high temps. Some come with metal knobs already.
- Tight-Fitting Lid: This is crucial for trapping that steam. Ensure the lid sits securely.
- Handles: Large, sturdy handles are helpful, especially when dealing with a heavy, hot Dutch oven.
Preheating: The Key to Success

This isn’t a step you can skip or rush. Preheating your Dutch oven properly is fundamental to a good sourdough bake.
Why Preheat?
- Initial Heat Shock: When your dough hits a super hot surface, it gets an immediate burst of energy. This intense heat helps trigger maximum oven spring right at the start.
- Crispy Bottom Crust: A screaming hot bottom ensures your crust develops evenly around the entire loaf, including the base. No one wants a pale, soft bottom crust.
- Efficient Steam Generation: The immediate contrast between the hot cast iron and the cooler dough helps generate steam quickly and effectively.
How to Preheat
- Place in Cold Oven: Put your empty Dutch oven (with the lid on) into a cold oven.
- Set Temperature: Turn your oven to your desired baking temperature, usually between 450-500°F (230-260°C).
- Heat Thoroughly: Allow the oven and Dutch oven to preheat for at least 30-60 minutes after the oven has reached temperature. Cast iron takes a while to absorb and hold heat. I usually aim for a full hour. Don’t rush this!
- Careful Handling: Remember, it will be extremely hot. Use proper oven mitts that cover your forearms when handling.
Baking Your Sourdough in the Dutch Oven

This is where the magic happens! Follow these steps for a smooth process.
Transferring Your Dough
- Dough Preparation: Your sourdough should be proofed and ready to bake. If it’s in a banneton, gently invert it onto a piece of parchment paper or directly into the Dutch oven if you’re confident.
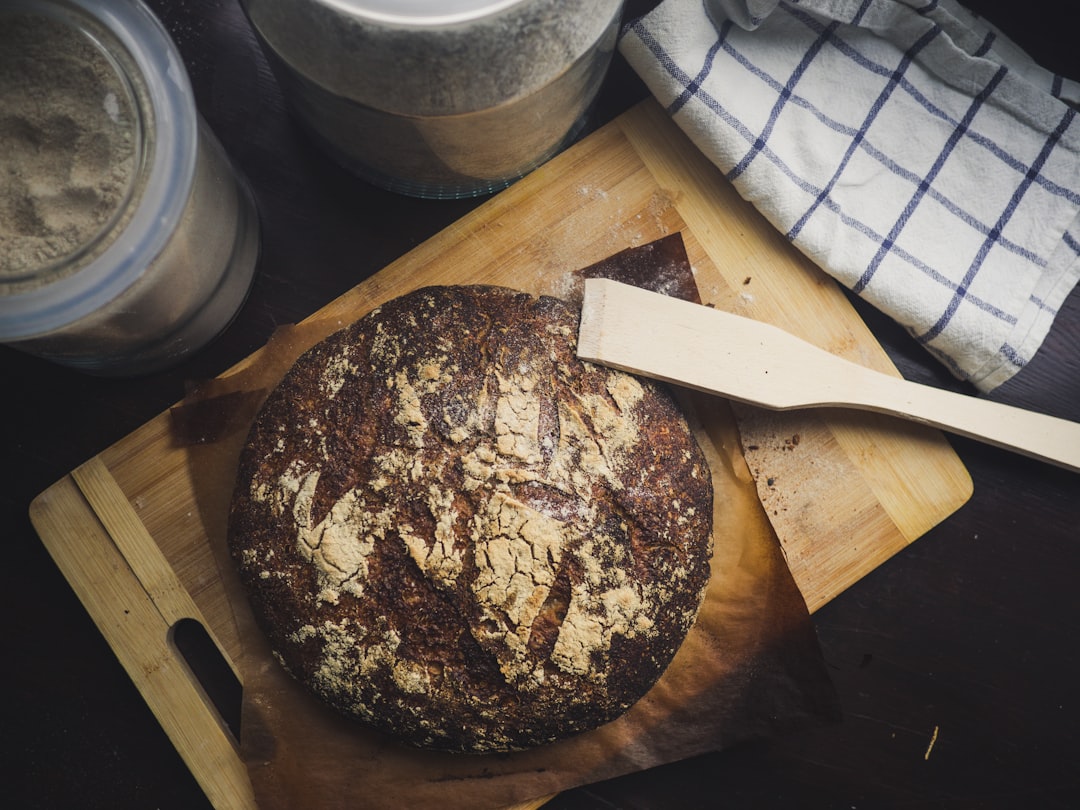
- Score: Use a sharp lame or razor blade to score your dough. This helps guide expansion and creates a beautiful design.
- Very Carefully: With heavily insulated oven mitts, remove the preheated Dutch oven from the oven. Set it on a heat-proof surface.
- Transfer: If using parchment paper, gently lift the dough by the paper and lower it into the Dutch oven. If going direct, carefully slide the dough in. Be quick but gentle; you don’t want to lose all that trapped heat or deflate your dough.
- Replace Lid: Immediately replace the hot lid. This traps the steam.
The Two-Stage Bake
Most sourdough recipes using a Dutch oven employ a two-stage baking process.
Stage 1: Covered Bake (Steam Phase)
- Duration: Typically 20-30 minutes. Consult your recipe, but this range is common.
- Temperature: Usually the higher temperature setting, often 450-500°F (230-260°C).
- Purpose: This is your steam phase. The covered Dutch oven traps the released moisture, allowing for maximum oven spring and a soft, pliable crust.
- Observation: Don’t peek! Resist the urge to lift the lid. Every time you open it, you let out precious steam.
Stage 2: Uncovered Bake (Crust Development)
- Duration: Typically 20-30 minutes, or until the crust is deeply golden brown and the internal temperature reaches 200-210°F (93-99°C).
- Temperature: Often reduced slightly (e.g., to 425-450°F / 220-230°C), but some recipes keep it high. Follow your recipe.
- Purpose: Once the lid is removed, the dry heat of the oven finally sets and crisps the crust, developing its color and flavor. This is when you get those beautiful blisters and that deep mahogany hue.
- Browning: If your crust isn’t browning enough, you can leave it in for a few more minutes. If it’s browning too quickly, you can reduce the temperature slightly more or place a piece of foil loosely over the top (though this rarely happens with sourdough).
Cooling Your Loaf
This step is just as important as the baking.
- Immediate Removal: As soon as your sourdough is baked to perfection, carefully remove it from the hot Dutch oven. Leaving it in will cause the bottom to steam and become soggy.
- Cooling Rack: Transfer the loaf directly to a wire cooling rack. This allows air to circulate around all sides, preventing a soggy bottom and allowing the moisture to equalize throughout the bread.
- Patience! This is the hardest part. Resist the urge to cut into your hot bread. Seriously. The internal structure of the loaf is still setting, and steam (which holds flavor) is still equalizing. Cutting it too early will result in a gummy texture. Wait at least 1-2 hours, or even longer, for best results. Your patience will be rewarded!
If you’re looking to elevate your sourdough baking experience, using a cast iron Dutch oven can make a significant difference in achieving that perfect crust and crumb. For more insights on mastering the art of sourdough, you might find this article particularly helpful as it offers valuable tips for perfect loaves every time. Check it out here to enhance your baking skills and discover new techniques that can transform your homemade bread.
Troubleshooting Common Issues
| Metric | Value |
|---|---|
| Temperature | 450°F |
| Baking Time | 30 minutes covered, 15 minutes uncovered |
| Preparation Time | 12-18 hours for sourdough fermentation |
| Size | 5-quart capacity |
Even with a Dutch oven, things can go awry. Here are a few common problems and how to address them.
Flat Loaf or Poor Oven Spring
- Issue: Your dough didn’t expand much during baking, resulting in a dense, flat loaf.
- Possible Causes:
- Under-proofed dough: The dough didn’t develop enough gas before baking.
- Over-proofed dough: The gluten structure has collapsed, and the gas has escaped.
- Not enough steam: Did you preheat your Dutch oven properly and replace the lid quickly?
- Weak starter: Your starter wasn’t active enough.
- Solutions: Adjust proofing times, ensure proper preheating, strengthen your starter. Learn to recognize the signs of properly proofed dough (the “poke test” is your friend).
Pale or Undercooked Crust
- Issue: The crust is light in color and lacks the desired crispness.
- Possible Causes:
- Not enough baking time (uncovered): You removed the lid too early, or didn’t bake long enough after.
- Oven temperature too low: Your oven might not be calibrated correctly.
- Dutch oven not preheated long enough: Insufficient initial heat.
- Not enough sugar/malted barley in dough: These contribute to browning.
- Solutions: Extend the uncovered bake time, increase oven temperature slightly, ensure adequate preheating. Calibrate your oven if you suspect it’s off.
Burnt Bottom
- Issue: The bottom of your loaf is significantly darker than the rest, possibly burnt and bitter.
- Possible Causes:
- Dutch oven too hot / too long on bottom: Sometimes, the heating element on the bottom of your oven blasts the Dutch oven directly.
- Insufficient cooling: Leaving the loaf in the hot Dutch oven after baking.
- Solutions: Try placing a pizza stone or an empty baking sheet on the rack below your Dutch oven to act as a heat shield. You can also place a piece of parchment paper under your dough in the Dutch oven, or even sprinkle a little cornmeal/semolina. Remove the loaf immediately after baking.
Gummy Interior
- Issue: The crumb is dense, wet, and sticks to your knife when cut.
- Possible Causes:
- Under-baked: The internal temperature didn’t reach 200-210°F (93-99°C).
- Cut too early: You didn’t let the loaf cool completely.
- Over-proofed dough: The gluten structure might have collapsed, leading to a denser texture.
- Solutions: Ensure adequate baking time (check internal temp!), always cool completely on a wire rack. Adjust proofing.
Maintaining Your Dutch Oven
A well-cared-for Dutch oven will last you a lifetime and continue to bake fantastic bread.
For Bare Cast Iron
- Cleaning: After each use, let it cool a bit. Scrape out any stuck bits with a metal spatula. Wash with hot water and a stiff brush or non-abrasive scrubber. Avoid harsh soaps if possible, as they can strip seasoning. If you must use soap, re-season afterwards.
- Drying: Thoroughly dry your Dutch oven immediately after washing. Put it on the stovetop over low heat for a few minutes until all moisture evaporates. Rust is cast iron’s enemy.
- Seasoning: Apply a very thin layer of high smoke-point oil (like grapeseed, flaxseed, or avocado oil) to the entire Dutch oven when it’s still warm. Wipe off any excess so it doesn’t become sticky. Bake upside down in a 400°F (200°C) oven for an hour to reinforce the seasoning. Do this periodically, especially if food starts to stick or it looks dry.
For Enameled Cast Iron
- Cleaning: Let it cool. Wash with warm, soapy water and a soft sponge or nylon brush. For stubborn stuck-on bits, fill with water, bring to a simmer, and scrape with a wooden or silicone utensil.
- Avoid: Metal utensils that can scratch the enamel. Abrasive cleaners or steel wool. Sudden temperature changes (don’t put a hot Dutch oven into cold water).
- Storage: Ensure it’s completely dry before storing.
By paying attention to these details, your Dutch oven will remain a reliable workhorse in your sourdough baking journey. Happy baking!